Transitioning from Cinema 4D to Unreal Engine 5 can feel a bit like learning to dance a new step in a familiar song. One common feature that you might miss is the intuitive camera orbiting around a central point, a staple in Cinema 4D for navigating 3D spaces. In Unreal Engine, this capability isn’t enabled by default, but don’t worry—it’s still within reach! Let’s dive into how you can activate the “Orbit Camera Around Selection” feature to make navigating your Unreal environments as smooth as your experiences in Cinema 4D.
Step into Unreal’s Orbit
In Cinema 4D, orbiting around a selected object is straightforward and part of the everyday workflow. This orbiting allows for a focused examination and modification of the object, enhancing both the efficiency and precision of modeling. Unreal Engine offers a similar feature, but it requires a bit of setup to get it working just like you’re accustomed to in Cinema 4D.
Activating Orbit Camera Around Selection in Unreal Engine 5
Here’s how to activate this essential feature and make your navigation in Unreal as comfortable as in Cinema 4D:
- Open Editor Preferences Settings: Start by accessing the Project Settings in Unreal Engine. You can find this by going to the main menu and selecting
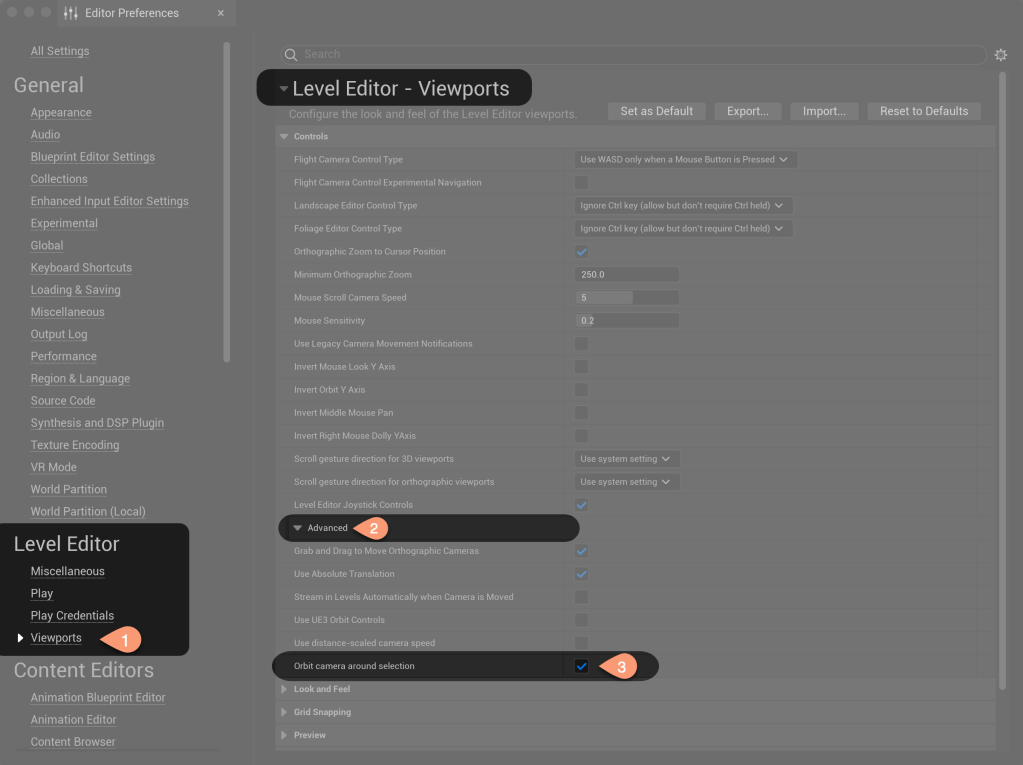
Edit > Project Settings. - Navigate to Editor Preferences: Within the Project Settings, you need to switch to Editor Preferences. This is often directly accessible through
Edit > Editor Preferencesas well. - Find the Orbit Settings: In the Editor Preferences, use the search bar at the top of the window and type “Orbit”. This will filter out the settings to show only those related to camera controls.
- Enable Orbit Camera Around Selection: You should see an option labeled something like “Orbit Camera Around Selection” or “Orbit Around Selected Object.” Check this box to enable the feature.
- Configure the Orbit Behavior: Depending on your version of Unreal Engine, you might have additional settings to tweak how the orbit behavior works, such as adjusting the sensitivity or specifying whether the orbit should focus on the object’s center or its bounding box.
- Save Your Settings: Don’t forget to apply and save your settings! This will ensure that the orbit behavior is enabled every time you open your project.
Why This Matters
For those who are used to the streamlined workflow of Cinema 4D, having a similar camera orbiting functionality in Unreal Engine can significantly ease the transition. It allows for:
- Enhanced Focus: Quickly focus on and orbit around objects of interest in your scene, just as you would in Cinema 4D.
- Efficient Navigation: Move through your Unreal scenes with the same fluidity and control you enjoy in Cinema 4D, making it easier to position and animate objects.
- Familiar Workflow: Minimize the learning curve when switching between software, allowing you to leverage your existing skills more effectively.
Embracing the New Universe
While Unreal Engine offers a plethora of advanced features that go beyond traditional 3D modeling and animation, knowing how to tailor it to fit your workflow from Cinema 4D can help you harness its full potential without feeling lost in a new environment. By enabling and using the Orbit Camera Around Selection, you’re not just customizing Unreal to work like Cinema 4D; you’re creating a bridge between two powerful creative tools, enhancing your ability to produce stunning visual content.
Happy orbiting in Unreal Engine! As you grow more accustomed to this new universe, you’ll find that it’s not just about adapting to Unreal—it’s about making Unreal adapt to you.
